fiducial marks#
Before processing scanned aerial images, you need to resample them to a common geometry using mm3d ReSampFid. The easiest way to do this is using the fiducial markers which are usually visible around the frame of the image.
For historical aerial images, follow the steps below to find the fiducial markers for resampling.
spymicmac.matching#
There are a number of functions in spymicmac.matching() that are designed to automatically locate fiducial
marker locations, given a MeasuresCamera.xml file and a template or camera type.
For matching generic cameras, use spymicmac.matching.find_fiducials(). The required arguments are the image
filename and a dict object of (marker name, template) pairs.
If you have already located the fiducial markers in a single image using, for example, mm3d SaisieAppuisInitQT,
you can use spymicmac.matching.templates_from_meas() to generate this:
from spymicmac import matching
from glob import glob

templ_dict = matching.templates_from_meas(fn_img)
imlist = glob('*.tif')

for fn in imlist:
    matching.find_fiducials(fn, templ_dict)
This function also assumes that there is a MeasuresCamera.xml file located in Ori-InterneScan; you can also
specify the file location using the fn_cam argument.
Additional keyword arguments to find_fiducials can be used to adjust the matching sensitivity or rotate the
MeasuresCamera.xml locations if the image is rotated (for example, if the data strip should be on the left side of
the image but the image was scanned with the data strip along the top of the image).
spymicmac.matching() also has a number of functions for matching specific camera/fiducial pattern types,
detailed in the following sections.
fairchild cameras#
Matching Fairchild-style cameras can be done using spymicmac.matching.match_fairchild(). In addition to the
image filename and template size to use, the camera model must be specified.
F224 and K17B style: F224, K17B (Metrogon lens); use
model='k17'KC-1 or T-11 style with ‘dot’ markers: KC-1, KC-1B, T-11 (Metrogon Lens); use
model='t11d'KC-1 or T-11 style with checkerboard markers: T-11; use
model='t11s'
For F224/K17 images, the assumption is normally that the “data strip” (focal length indicator) is in the lower right
corner of the image, as shown here. Use the data_strip argument to indicate where the data
strip is located in the scanned image (left, right, top, or bot).
For KC-1 and T-11 style images, the assumption is that the “data strip” is along the left-hand side of the image, as shown here.
Note
If your MeasuresCamera.xml file has a different fiducial marker pattern than the assumed location, use
data_strip='right' for F224/K17 style images, and data_strip='left' for KC-1/T-11 style image (the default
options). This ensures that the fiducial marker locations will not be rotated.
wild cameras#
Matching Wild RC-style cameras can be done using spymicmac.matching.match_wild_rc(). As with
spymicmac.matching.match_fairchild(), the camera model must be specified:
Wild RC5 and RC8: Wild RC5A, RC5, RC8 (Aviogon Lens); use
model='rc5'ormodel='rc8'Wild RC10: Wild RC8, RC10 (Aviogon Lens); use
model='rc10'
For Wild Cameras, the assumption is normally that the “data strip” is along the left-hand side of the image, as shown
here. Use the data_strip argument to indicate where the data strip is located in the scanned
image (left, right, top, or bot).
Note
If your MeasuresCamera.xml file has a different fiducial marker pattern, use data_strip='left'
(the default option).
zeiss rmk cameras#
Matching Zeiss RMK-style cameras can be done using spymicmac.matching.match_zeiss_rmk(). Here, size
controls the size of the zero-padding around the dot to use, while dot_size controls the size of the dot in the
fiducial marker.
At present, there are two options for Zeiss RMK-style cameras:
mid-side only (Zeiss Cameras): use
corner_size=None(the default option)mid-side + corner markers (Zeiss RMK A 15/23 (Pleogon Lens)): specify a size for the cross-shaped corner markers
As with other camera models, the assumption is that the “data strip” is along the left-hand side of the image, as shown
here and here. Use the data_strip argument to indicate where the data
strip is located in the scanned image (left, right, top, or bot).
Note
If your MeasuresCamera.xml file has a different fiducial marker pattern, use data_strip='left'
(the default option).
SaisieAppuisInitQT#
To locate the fiducial marker locations manually, you can also use mm3d SaisieAppuisInitQT
(or mm3d SaisieAppuisInit, if your system does not have the QT tools installed).
For working on a number of images, you can also use spymicmac.micmac.batch_saisie_fids() as follows:
from spymicmac.micmac import batch_saisie_fids
from glob import glob

imlist = glob('*.tif')
batch_saisie_fids(imlist, flavor='qt')
This will call SaisieAppuisInit on each image in turn, and move the resulting MeasuresIm files to the Ori-InterneScan
directory.
Note
In order to run spymicmac.micmac.batch_saisie_fids(), you need to have either:
a
MeasuresCamera.xmlfile inOri-InterneScan; oran
id_fiducial.txtfile in the current directory (see here)
Note that the names of the fiducial markers in id_fiducial.txt must match the names in MeasuresCamera.xml
in order to work with mm3d ReSampFid.
The MicMac program for inputting fiducial mark locations is SaisieAppuisInitQT
(or just SaisieAppuisInit if you don’t have the QT version set up). For each image, you’ll need to run the following:
mm3d SaisieAppuisInitQT <Img> NONE id_fiducial.txt MeasuresIm-<Img>.xml
This will open a window like the following:
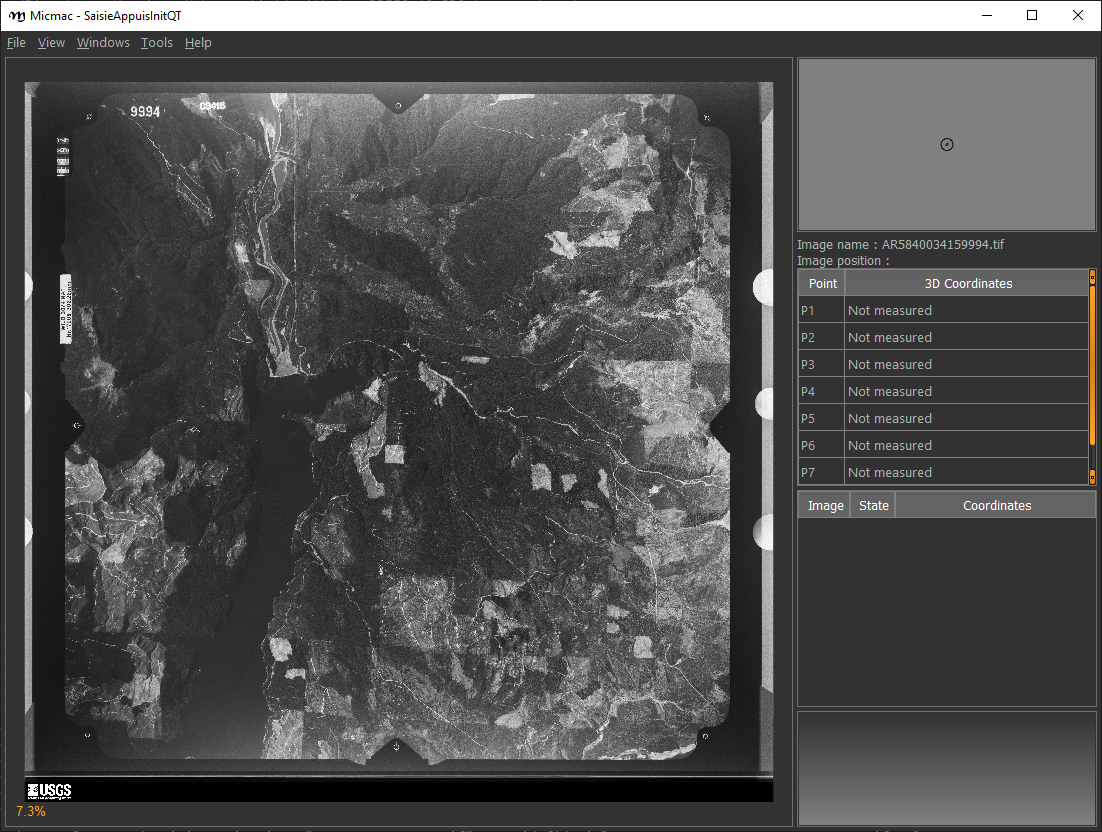
For each fiducial marker listed in id_fiducial.txt, you’ll need to zoom in on the marker, click
the name in the table on the right, and then click on the fiducial marker in the main window. If necessary, you can
also move the marker once you’ve placed it (because we all make mistakes).
Once you have selected the location for each fiducial marker, select File > Exit to save the point locations to
MeasuresIm-<Img>.xml.
Note
If you are running mm3d SaisieAppuisInitQT from the command prompt, this will actually create two files
in the current directory:
MeasuresIm-<Img>-S2D.xmlMeasuresIm-<Img>-S3D.xml
As these are only two-dimensional points, you can discard the S3D.xml file. You’ll need to move the S2D.xml
file to a new folder, Ori-InterneScan, and rename it to remove the -S2D part of the name.
In other words:
rm MeasuresIm-AR5840034159994.tif-S3D.xml
mkdir Ori-InterneScan
mv MeasuresIm-AR5840034159994.tif-S2D.xml Ori-InterneScan/MeasuresIm-AR5840034159994.tif.xml
Kugelhupf#
If you have a number of images, and the fiducial marks are in approximately the same place,
you can also use mm3d Kugelhupf to detect fiducial marks in the other images based on a template image:
Kugelhupf (Klics Ubuesques Grandement Evites, Lent, Hasardeux mais Utilisable pour Points Fiduciaux): Automatic fiducial point determination
*****************************
*  Help for Elise Arg main  *
*****************************
Mandatory unnamed args :
  * string :: {Pattern of scanned images}
  * string :: {2d fiducial points of an image}
Named args :
  * [Name=TargetHalfSize] INT :: {Target half size in pixels (Def=64)}
  * [Name=SearchIncertitude] INT :: {Search incertitude in pixels (Def=5)}
  * [Name=SearchStep] REAL :: {Search step in pixels (Def=0.5)}
  * [Name=Threshold] REAL :: {Limit to accept a correlation (Def=0.90)}
As an example:
mm3d Kugelhupf AR5840034159994.tif Ori-InterneScan/MeasuresIm-AR5840034159994.tif.xml
This command will take the locations from the MeasuresIm file specified by the second argument and search any of the remaining images using template matching, to try to find their locations automatically.
Note that it does not always work, especially for images where the fiducial mark is a dot rather than a crosshair or target.
Once you have all of the image points, you can move on to the next step: re-sampling the images.